Next Show: April 20th & 21st, 2018


Home i Event Info i Tickets i Classes i Vendors i FAQ's

Wednesday, December 26, 2012

Christmas Layout

I hope you had a fun, relaxing and enjoyable Christmas yesterday! With the gifts unwrapped and the photos taken, it is time to document all those great memories!
 
Ange here today with Best Present Ever! layout. Die Cuts With a View Crafty Christmas stack and Nuts About Sketches are a hot combo for a fun Christmas page! My dad is always the hardest person to buy for which usually results in some interesting presents for him. Last year we ended up putting our youngest in this huge box and letting my dad unwrap him. The most amazing part of the whole thing was, at only 2, how quiet he was until my dad got the box open. 

I used this fun paper with the tree with presents under it for the base, cut a slit up each side of the tree with a craft knife and slid the red striped paper under. Then I cut some of the cute journaling tags from another sheet and presents from a scrap paper from a previous layout and layered them on this layout. The To/From tag was also cut from the Crafty Christmas stack, layered with foam tape onto green cs and then I added twine. To finish the layout off I added washi tape to one photo, red stickles to presents and candy canes on the tree and did a little doodling around the edge of the page. Hope you have fun with your family this holiday season! :)Ange

Supplies:
DCWV - pp, cs
NAS - sketch #243
american crafts - thickers
ranger - stickles
recollections - washi tape
stampin up - marker 
tombow - glue runner
ek tools - foam adhesive 
stash - twine

Saturday, December 22, 2012

Still Wrapping, Try This!

Ange here with some fun and easy boxes for gifting. I made all of these using papers from DCWV Crafty Christmas stack and added in some fun hand made paper bows using the DCWV Arctic Wishes mat stack.  
 
I think I started with this tutorial here: Box. But really all you need to remember is that you want the lid to be about 1/8 of an inch bigger than the bottom so that it fits well. So for a 2x3 box with 1in. sides you cut a piece of paper that is 4x5 and score in 1 inch on each side, cut along the score line on two sides (but don't cut the corners out), fold in and tape. Then for the lid remember to add 1/8 for a nice fit. Also if you're going to do some border punching like I did, you'll want to consider how much the punch will take off. So for this example you would want to cut a paper 4-1/8x5-1/8, so that after the punching you have a bit of a fancy lid design showing on the side. For a deeper punched design you would need to add more.

Make your own bows like I did, tie them up with twine or add a little embellishment from your stash and you have a fun little box to gift your special present in.


DCWV - pp 
SEI - ink 
martha stewart - punch
glue dots
ek tools - foam & tape adhesive 
tombow - tape runner
american crafts - snowflakes
stash - pearl

Friday, December 21, 2012

Christmas Gift Tage DIY with DCWV

I love wrapping gifts. I'm not sure when this love started, but I remember asking my mom if I could wrap the Christmas presents each year.  She never seemed to complain...

With the wrapping comes the need for gift tags. Instead of buying them this year, I decided to make them. I wanted them to be easy to keep track of though. (Nothing worse than spending time making something just to lose it before you can use it!)

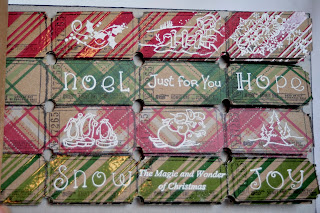
So, I decided to make a ticket tag book.  

All the fun papers that make up this book come from the DCWV "Crafty Christmas" stack. I love the red and green stripes and plaids! They are so fun!  

I used some "Fairy Dust"  Creative Inspirations Paint to add some beautiful shimmer to the snow. I also used some Enamel Accents to the eyes and mouth for a little pop of texture.

The inside is made up of ticket strips... I die cut them from my favorite papers from the stack using the Tim Holtz "Ticket Strip" die. I then used Archival ink to stamp on the image of the ticket.  (Always use an ink made for non-porous surfaces when you are stamping over the varnish!).  I then stamped and embossed all the white images.  
Although it looks like it would take a long time to stamp and emboss all those images, I think I spent more time going through all my holiday stamps to find the images. =)

All the backs have "To:"  & "From:" stamped on them, so they are ready to add to packages.

Now, to get the shopping done...

Enjoy!

Supplies Used:
Paper: DCWV "Crafty Christmas" stack
Ink: Archival Ink, VersaMark, Mark-It
Stamps: Tim Holtz "Odds & Ends", Doodlebug "Alphabet", Personal Sentiments "Skate & Ski", & "Winter Quiet", Great Impressions "Magic and Wonder" & "Christmas Town", Crafter's Companion "Just for You", Inkadinkado "Snowflakes", Studio G
Dies: Quickutz "Nesting Circles", Tim Holtz "Ticket Strip"
Creative Inspirations Paint: Fairy Dust
Other: Enamel Accents, rhinestones

Thursday, December 20, 2012

Holiday Traditions - What Are Yours?

Hello and good morning....

It's Wendi here, and I'm sharing a Christmas layout that I created using the Basic Grey Aspen Frost line... One of our family's favorite Christmas traditions is to open one present the night before. It's pretty much always the same thing... new Christmas pajamas.. So we put them on and take pictures in front of the tree with our new pjs.

 I used the Aspen Frost Garland in two places to add some banners on the page:
And I used some of the Aspen Frost Die Cut Shapes as accent pieces on the layout:
I used my scallop border punch for the perfect ending of the page, it kinda gives it a fun holiday feel:

So what are some of your holiday traditions????

Have a wonderful day!!!!

Wednesday, December 19, 2012

Homemade Gift Box with DCWV Crafty Christmas Collection

Hello everyone!
Tis the season to need gift wrapping! There always seems to be some little trinket that doesn't really fit traditional wrapping.  When such is the case, make your own!

Here is the template I used for my box.


I used the DCWV "Crafty Christmas" cardstock for the box. The snowflakes are printed on kraft paper and then a varnish is printed over them. The fun thing about that is it acts as a resist!  

I wanted this box to have a frostier look than the kraft color, so I used some Picket Fence Distress Stain to change the background. The varnished snowflakes really pop against the white background!

So many possibilities for the varnished card stock!

Enjoy!


Supplies Used:
Paper: DCWV "Crafty Christmas" stack
Ink: distress ink, Colorbox, VersaMark
Stamps: Crafter's Companion "Just for You", Inkadinkado "Snowflakes"
Dies: Quickutz "Nesting Circles"
Other: crinkle ribbon, rhinestones, thread, embossing powder, Colorbok template

Tuesday, December 18, 2012

Christmas Clock


You know when you have an idea in your head but just never get around to doing it? Well, that's how this project was for me. It's been on hold in my mind for a few months now. I was waiting for Christmas specifically and for the right supplies too. And funny enough, when I went to buy the charger at Michaels, I noticed a project paper for it from Martha Stewart by the paints. I guess Marth and I were on the same page! We both wanted to make clocks out of chargers for Christmas. But, I swear, my idea was independent of hers!

Anyway, this project came together so easy and took less than an hour. Die Cuts With A View has some beautiful papers out right now, including this stack, "The Traditional Holiday" available at Michaels, all printed on kraft paper. I love it! The kraft paper thing is right up my alley-vintage and homespun. The images they printed are also vintage inspired, from the wording, the images... And I love that many of the pages have gold foil on them too. So pretty!

The supplies you need are some gorgeous paper, a plastic charger (the one I bought has a designed edge which I really liked for this project), clock parts, drill, adhesive, hot glue gun, ribbon, and any other embellishments you'd like.

It's also a relatively inexpensive project, making it that much better. I started by cutting out a circle from one of the papers. The background paper I chose had some big writing on it, some in gold foil, with images of toys. I used my Silhouette machine to cut a 7.25" circle. It was slightly smaller than the space on the charger, but it was okay because I added ribbon later. Next, I found the cute image of Santa with the children on one of the papers and cut it out. Before adhering any of the papers to the charger, I adhered the Santa image to the background paper (with all the wording) so that I could cut the Santa along the right circular line. Once that was done, I used wood glue to adhere the entire thing to the charger. Yep, I used wood glue. I'm not a huge fan of modge podge for stuff like this and prefer the wood glue. I did have to keep smoothing it down a bit because the paper is thick. I allowed that to dry for 20 minutes or so and then put some small dots of hot glue around any edges that still were not down.

Once that was ready, I hot glued the ribbon down. This ribbon was also from Michaels and had some gold through the middle to match the wording. It was perfect! I just did a section at a time.


Next, I grabbed the hubby's drill, measured out the middle of the charger and marked it with an "x", and then drilled a hole. I needed to smooth some of the paper out. Once the hole was done, I added the clock parts. The clock parts I got were a 3/4" size from Michaels as well.

Finally, it needed some finishing touches. Again, I had some supplies from Michaels on hand. A gorgeous burlap flower and a burgundy felt flower from Jolee's Boutique. I cut one of the tags from my paper stack out that reads "Tis the Season to Be Jolly". I layered those babies up with some hot glue and my clock was complete! I may spray it with a matte sealer (being sure to take out the clock parts first), but we'll see.

And now my family has something perfect to enjoy Christmas "time"!


Monday, December 17, 2012

Peppermint Bath Salts + DCWV = Great Gift Idea

Hello everyone!

Did you know that Peppermint oil has long been used to ease stress, boost energy, and elevate mood and mental clarity?  Sounds like what the doctor ordered for the holiday season, don't you think?

Peppermint bath salts
Equal parts Epson Salt & Sea Salt
A little Peppermint oil (careful, it's strong stuff! Don't over do it!)
A tiny bit of Orange Essential oil (this adds just a hint of sweet)
Soap coloring (if desired)

Place everything in a plastic baggie and shake. 

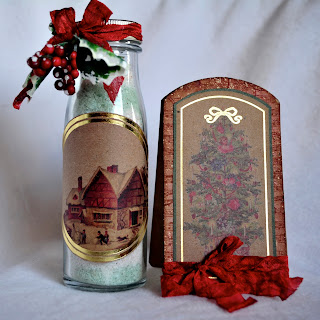
Now to package.... I love the look of bath salts in glass jars. There is just something elegant about it. So, I used an old "Got Flowers" jar from Prima, and filled it up. (It holds about a cup of salts).

Of course you can leave it there, but, I've been very into labels lately... 

DCWV "Traditional Holiday" stack has this beautiful circle as part of a border for one of the pages. I cut it out and glued it to the jar. It is super easy, and wonderfully beautiful. I tied a crinkle ribbon around the lid and added some holly. I think a candy cane tucked into the bow would also be fabulous!

And of course, you have to have a card. =)

I simply cut out one of the tags from the same paper stack and layered it on some altered kraft paper that I cut to make a custom shaped card. 

Enjoy!

Supplies used:
Paper: DCWV "Traditional Holiday", tissue paper, kraft
Ink: Archival Ink, Distress Ink
Stamps: Prima "Music", 
Creative Inspirations Paint: Gold
Other: Rock candy glitter, Prima bottle, silk floral, gesso, crinkle ribbon


Friday, December 14, 2012

Personal Gifts with MME - It's Not Too Late!

Andrea here with a Christmas gift idea!  Since I lack basic baking skills and we don't always know what to buy our various family members, my husband and I started making DVD's to give away as Christmas gifts.  Using a program like Adobe, we can make slide shows from family photos and video footage taken throughout the year (and if you're not tech-savvy, there are many companies that you can hire to do this for you).  This gift is personal, is always appreciated and can be extremely cost-effective.  And what better way is there to add an extra bit of "oomph" to the gift than packaging it with style?


I made this CD cover and decorative "belly band" using the absolutely beautiful "All is Bright" Christmas collection from My Mind's Eye.  Simply put, this is one of my favorite Christmas collections EVER.


Belly bands are a relatively easy way to dress up any sort of box or container.  You can wrap the box (or not) then wrap on a belly band to spruce it up.  They're a great alternative to a standard gift bow and with drool-causing collections like this one, your job's a snap!


So why not compile some family photos and make a DVD that will continue to give for generations?  You just can't beat watching your family's truimphs, disasters and embarrassments on the the big screen.  It's a gift that's thoughtful, personal and sure to be enjoyed during many holiday get-togethers.  And the best part is that you, as the Chief Editor, get to pick whether or not to include that awesome picture of you in 7th grade with scary hair, braces and half-closed eyes!  Happy holidays are coming!

Thursday, December 13, 2012

December Daily Album

Hello and good morning...

It's Wendi here, and I am sharing my December Daily album that I created using Basic Grey's Aspen Frost collection pack. Are you working on a December Daily album? I have wanted to create one for years!!! and have kept meaning to, but never actually doing it. I either know I have too much on my plate, or something else has become a priority. But this year I am going for it, and already have my album done. I just need to add the journaling and photos.

I picked up a journal from Target in the office supplies section:
Next I used the Aspen Frost line to create my cover, which I just used paper, a few of the Element stickers  and some of the Die Cut shapes.
I added a bit of bling from my stash and some twine.
The inside cover page I created looks like this:
And here are the first few pages to show you what I did. I just added a few strips of paper to the left side, and maybe a die cut or sticker. And then on the right side, I cut apart of the Garland and added numbers for the dates.

I'm trying to focus on the journaling aspect of December, and then add a photo or two.

So what are you working on for December??? make sure to share with us in the comments if you are working on an album, I'd love to check it out.

Have a wonderful day!!!!

Quick & Easy Holiday Layout using MME

Hello! Heather here with a quick and easy holiday layout that you can complete in 30 minutes or less. So we're in the thick of the holiday season, which is a very busy time for most of us. Often times we end up setting aside our scrapbooking time for more important tasks such as holiday shopping, baking and visiting with friends and family. But we still have those fun holiday photos that we want to get into books, right? Today I am going to show you how you can create a cute holiday layout in 30 minutes or less by using coordinating papers and embellishments. I got the privelege of playing with the most ADORABLE Winter Wonderland Collection from My Mind's Eye. This collection is great because it will work well for your holiday layouts, or just your winter themed pages equally. Here is my layout:
When I am trying to get a layout done in a hurry I usually start with a sketch I like. It takes a lot of the guess work out of it and allows you to just get to creating. Here I used a sketch from Creative Scrappers (#204) as a starting off point. I also created a title using the matching embellishments that coordinate with the line. Here I created a banner with some stickers and (the cutest!) baker's twine, and added some additional chipboard stickers to spell the "Merry Christmas".
I then added some additional fun chipboard elements around the page. I love that these have an adhesive backing, so it makes them very user-friendly (and fast!). Also- the cute candy caned striped border piece is also a sticker- more time saved!
The green polka dot strip was from the edge of the paper where they have the bar code, collection title and a preview of what is on the other side of the paper. I like to cut these out and use them- then I can use an element of the pattern without cutting into my 12x12 piece! These little present embellies are also chipboard- so much fun!
 OMG- I think I am just IN LOVE with these enamel dots! They are such a fun way to add a little pop of color or a confetti look and they are adhesive-backed so no hole punching!!

I hope you have enjoyed my project today and are inspired to take 30 minutes to get some fun holiday layouts completed while in the midst of this busy season. Thanks for stopping by today!

Wednesday, December 12, 2012

Darling Cookie Cutter Ornaments with MME

Andrea here with a fun Holiday project that involves cookie cutters, but doesn't involve ovens (I think we've established that baking is not my forte)!  So instead of cutting dough with these holiday cookie cutters, I used them to make some festive Christmas ornaments instead.  Behold this little trio!


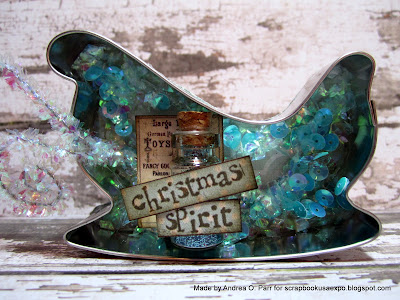
To make these, I started out with the FABULOUS All is Bright collection from My Mind's Eye and a pack of holiday cookie cutters that I picked up for just a couple of bucks.  I laid the cookie cutter onto the paper, traced around it, cut out the shape, then glued it to the back of the cookie cutter.  This created an instant "mini shadowbox" of sorts.


I used the All is Bright paper for the background of each of these ornaments and also used many of the stickers from this collection.  I "glammed up" the edges with glitter, glitter flakes and sequins and threw on some 3D elements.


This star-shaped cookie cutter made me think of light, so I added a whimsical lightbulb as the focal point.


For the sled, I went with a little bottle filled with glitter and labeled it, "Christmas Spirit."  I liked the idea of a sled rushing around sprinkling everyone with the feeling of Christmas.  As we all know, it can be harder to catch some years than others!


All in all, these ornaments are fun to make and can be used in lots of ways.  If you don't want to use them as ornaments, you could also use them as place card holders for a holiday dinner.  Just glue a paperclip or a wire curl to the back which can hold a slip of paper with different guests' names (the Christmas tree one is an example of this).  You can also attach these cookie cutters to gifts in the place of a bow for a very fancy wrap job.  You could even stick a gift card to the back for the perfect gift combo: something handmade combined with something store bought that you know the receiver will use and enjoy.  

The bottom line?  With cookie cutters being so cost effective and so crafty-cute, there's no reason NOT to use them outside of the kitchen, too!

Tuesday, December 11, 2012

Show Tickets Coming Available + Gypsy Cricut Giveaway


Looking for the PERFECT (& priceless) gift this year? You don't have to look any further!

Pick up tickets for yourself and for those you love and give the gift of a
"DAY OUT TOGETHER"

Your mother, sisters, friends, daughters and other special ladies in your life will Thank YOU!


The Original Scrapbook USA Expo will be here March 22-23, 2013!

Early Tickets* are available beginning tomorrow (12/12/12) for a LIMITED TIME!

Purchase tickets, print and these will be "Stocking Stuffers" that will be LOVED!

Available Tickets include:
1 Day $12.00
2 Day $22.00
Early Bird $20.00
Young Scrapper's Club $12.00 (Use code "club" for buy 1 get 1 free)**
VIP (limited quantities) - 20% off
All Night Crop (limited quantities)

Early Online Tickets will be available through December 24th (or until gone)
Remaining tickets will go on sale again on February 13th.

*Tickets are non-refundable
**Young Scrapper's Club Activities will be held Friday March 22, 2013 from 5:00-9:00 pm. Activities include: General Show Admission, Karaoke, dancing, nails, glitter tattoos, crafts and treats. Appropriate for ages 6-12. Must have a Young Scrapper's Ticket to enter. Children under 10 get into the show free but must purchase a Young Scrapper's Ticket to enter Club Activities.

PLUS! Let's spread some Holiday Cheer with a little Giveaway!

Who would like to see a Cricut Gypsy under their tree this year?
Enter for your chance to have one delivered to your doorstep in time for Christmas Morning!


a Rafflecopter giveaway

Monday, December 10, 2012

December Challenge Using our Card Sketch

Hello and good morning!!!!

It's Wendi here, and I am super excited to share the new December challenge with you today... Since this is the month of Christmas, and if you are like me, you still have a TON of Christmas or holidays cards that need to get made and sent out. So for this month's challenge we are providing you with a card sketch to get your mojo kick started.

Use this sketch to create a Christmas card:

I created this card with the sketch, using Basic Grey's Aspen Frost line
In addition I do want to add in that each time you make a card to remember to make one extra to bring to the show to donate to our "Care With Cards" program. We collected over 10,000 cards in 2012 that were donated to Huntsman Cancer Institute and Operation Write Home.

So since you have the sketch handy, why not just make another card????
Here's a second card that I created with the same sketch:
I also used the Basic Grey Card Kit which creates 12 cards!!!!! They were super easy and fun to put together. I ended up adding some machine stitching and some pop dots to add a bit to each card.
Here are the three cards, and then there is enough in the kit to make 4 of each:

 And here's what I finished with:


Talk about boosting your stash quickly...

So for the December Challenge:
Create a NEW card using the sketch above.
If you have a blog ADD your project to this blog post using the link below, NO LATER than December 31, midnight MST. If you do not have a blog please e-mail a photo of your project to info@scrapbookusaexpo.com and we will add your project here.
You can enter a MAX of TWO times, one for the card you create and the second for the card to be brought to the "Care With Cards" program.

A random winner will receive a prize from the entries for this contest and it's a wonderful prize pack from My Mind's Eye PLUS everyone who participates will receive a free ticket to our March show!!!!!

Have fun and craft away!!!!!

Friday, December 7, 2012

My Mind's Eye Christmas Layout

Hello friends! It's Heather and I have another fun holiday layout to share with you today using the ADORABLE Winter Wonderland collection from My Mind's Eye. I love the bright colors in this collection, it was really fun to work with. Here is my layout:


 My cute nephews got their picture taken with 'Santa' (it was their dad dressed as Santa, how cute is that??) and the bright colors in the photo matched perfectly with the bright colors in the papers. I used a cute sketch from Jenny Evans as inspiration, and then just ran with it. I started with some spray ink on white cardstock. I figured out that if you depress the nozzle slowly you get the bigger paint splatters, vs the fine mist you get when you depress it quickly. I like the bigger splatters so it took a lot of trial and error to figure that out!

Next I cut out a bunch of solid circles and circle frames on my die cutting machine out of several different coordinating papers and layered them beneath my photo. I topped them with some cute buttons and chipboard shapes for a fun, whimsical look.


I used a sticker as my title (love what a time saver that is!!) and added some additional stickers and my project was complete! I hope you enjoyed my project, thanks so much for stopping by today!!