Next Show: April 20th & 21st, 2018


Home i Event Info i Tickets i Classes i Vendors i FAQ's

Showing posts with label Andrea. Show all posts

Friday, September 13, 2013

"Solstice" Altered Project with DCWV and Andrea

Andrea here with a great way to alter your patterned paper so that it perfectly fits any project!  You know how it is: we buy paper we adore, or we buy it in big packs, but then we can't find a sentiment or scene or picture that goes with the pattern (or maybe that's just my problem)!  In any event, check out the card I made and I'll show you how I altered the patterned paper from its original form so it fit the "card vision" I had in mind:


I started out with this bold floral print from DCWV's "Solstice" stack, as pictured below.  I loved the turquoise and coral-colored flowers, but needed more solid-colored space (as opposed to the pattern) to make my card idea work.


Using an old gift card like a spatula, I scraped gesso across the page, leaving some of my favorite flowers peeking through.  The great thing about DCWV paper is that it's sturdy enough to handle this process.


While the gesso was still wet, I patted on some torn vintage pages and rubbed the gesso over the edges of it with my fingers.


Next I used a foam brush and added streaks of three different shades of acrylic paint.  I used the same brush for all three colors (without washing it in between) so that they mixed on my brush to create new colors.


I waited for the page to dry, then I stamped some polka dots on the background with a rubber stamp and dark brown and teal ink.


After that, my new background page was ready to go!  I cut it in pieces to use for cards, and there you have it!  See it peeking out from my card's layers? I attached the whole thing to a striped background (Fancy Pants), and added a Bingo card-type of sentiment on top (Teresa Collins).  The paper framing the Bingo card is from Simple Stories.  I also added a strip of fabric and a fabulous key-shaped clip from PrimaThere is some scalloped lace at the bottom and I stamped the sentiment, "make them matter" using a set of alphabet stamps by Studio G.


Altering patterned paper is a great way to re-purpose and make full use of your current stash.  Plus it feels like a pretty nifty accomplishment to make your "own" unique patterned paper!

Wednesday, September 11, 2013

"The Primrose" Stack from DCWV

Hello all!  Andrea here and I just MUST rave about The Primrose stack from DCWV!  It's one of my favorite lines they've done with its romantic pastels and soft images like birds, flowers and butterflies.  Here's a card I made using some of this fantastic paper:


I adore the ruler-edge bottom and the birdcage, postal stamp and flowers you can see in the background.  The girl stamp I used is from Julie Nutting's line through Prima.  I made the dress out of fabric scraps and added some Washi tape to the background for even more visual interest.  I also used chalks to color in the girl's skin and hair and rosy cheeks.


Lastly, I finished off the card with this great sentiment stamp from Unity Stamp Company ("She remained true to herself").  I love that saying because it reminds me to live up to whatever I hold most dear and to not waste energy trying to be someone else.

In addition to the fun patterned paper, this stack also has a lot of flags and frames that you can cut out for all sorts of projects.  The possibilities are endless and if there's one "must-have" paper pad from DCWV, The Primrose stack is it!

Tuesday, April 16, 2013

CUTE Card with Fold-Out Component!

Andrea here and by now you've read Kristin's excellent posts about ScrapCodes!  These crazy little scan-able stickers allow you to combine technology and art.  Include one of these ScrapCodes on your journal pages, layouts, cards or tags to share pictures, videos, etc., with friends and family.

I decided to try one of these ScrapCodes out myself.  But as Kristin said in one of her posts, what do you do if you don't think the "look" of a ScrapCode fits into your design?  Simple!  Put it in a pocket or make it a fold-out component!

Here's a card I made with a hidden ScrapCode tag in a pocket:


When someone pulls out the tag, they'll have the ScrapCode surprise!


If you want to incorporate something high tech into your crafting, then check out the ScrapCodes website.  They have a demo video of what these code stickers can do and they give you step-by-step instructions on how you can try them for yourself.  They are a great option for those of us who want to take the next daring step in technology!

Tuesday, February 5, 2013

A Note of Love Using Fancy Pants

Hello there!  Andrea here and I'm very giddy about the "Love Note" collection from Fancy Pants Designs.  I'm a long-time fan of Fancy Pants and always look forward to what they come up with.

Here's a piece of framed Valentine's art that I created using some of their fabulous paper and stickers:


For the background, I used a piece of the Love Note white paper with pink text and I shot a spritz of "pretty pink" color mist on it (Mister Huey's brand).

I used a Chevron stripe sticker and layered two pieces of fabric on top of it.  This collection also comes with some gorgeous corrugated pink paper, which I punched a heart out of.


To embellish, I added a mini pink binder clip and attached a "true love" sentiment sticker, which is also from this Fancy Pants Designs line.


The Love Note collection has a great mix of whimsical patterns and you can either go bold or soft with your color pallet choices.  The colors range from black and white and bright magenta's to soft pinks and grays.  All in all, a great line that's just in time for Valentine's Day!

And hey- you know what February means, right?  It means we are only ONE month away from the Scrapbook USA Expo!!!  Yipppeeee!  Don't forget to mark your calendars, pack your bags, or do whatever else needs to be done to be ready for March 22nd and 23rd in Utah!  It will be epic, as always!

Friday, December 14, 2012

Personal Gifts with MME - It's Not Too Late!

Andrea here with a Christmas gift idea!  Since I lack basic baking skills and we don't always know what to buy our various family members, my husband and I started making DVD's to give away as Christmas gifts.  Using a program like Adobe, we can make slide shows from family photos and video footage taken throughout the year (and if you're not tech-savvy, there are many companies that you can hire to do this for you).  This gift is personal, is always appreciated and can be extremely cost-effective.  And what better way is there to add an extra bit of "oomph" to the gift than packaging it with style?


I made this CD cover and decorative "belly band" using the absolutely beautiful "All is Bright" Christmas collection from My Mind's Eye.  Simply put, this is one of my favorite Christmas collections EVER.


Belly bands are a relatively easy way to dress up any sort of box or container.  You can wrap the box (or not) then wrap on a belly band to spruce it up.  They're a great alternative to a standard gift bow and with drool-causing collections like this one, your job's a snap!


So why not compile some family photos and make a DVD that will continue to give for generations?  You just can't beat watching your family's truimphs, disasters and embarrassments on the the big screen.  It's a gift that's thoughtful, personal and sure to be enjoyed during many holiday get-togethers.  And the best part is that you, as the Chief Editor, get to pick whether or not to include that awesome picture of you in 7th grade with scary hair, braces and half-closed eyes!  Happy holidays are coming!

Wednesday, December 12, 2012

Darling Cookie Cutter Ornaments with MME

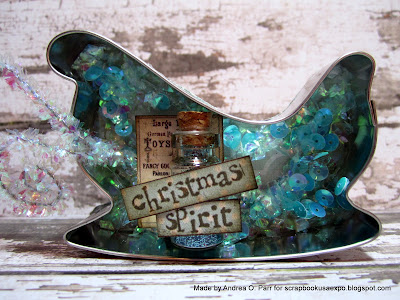
Andrea here with a fun Holiday project that involves cookie cutters, but doesn't involve ovens (I think we've established that baking is not my forte)!  So instead of cutting dough with these holiday cookie cutters, I used them to make some festive Christmas ornaments instead.  Behold this little trio!


To make these, I started out with the FABULOUS All is Bright collection from My Mind's Eye and a pack of holiday cookie cutters that I picked up for just a couple of bucks.  I laid the cookie cutter onto the paper, traced around it, cut out the shape, then glued it to the back of the cookie cutter.  This created an instant "mini shadowbox" of sorts.


I used the All is Bright paper for the background of each of these ornaments and also used many of the stickers from this collection.  I "glammed up" the edges with glitter, glitter flakes and sequins and threw on some 3D elements.


This star-shaped cookie cutter made me think of light, so I added a whimsical lightbulb as the focal point.


For the sled, I went with a little bottle filled with glitter and labeled it, "Christmas Spirit."  I liked the idea of a sled rushing around sprinkling everyone with the feeling of Christmas.  As we all know, it can be harder to catch some years than others!


All in all, these ornaments are fun to make and can be used in lots of ways.  If you don't want to use them as ornaments, you could also use them as place card holders for a holiday dinner.  Just glue a paperclip or a wire curl to the back which can hold a slip of paper with different guests' names (the Christmas tree one is an example of this).  You can also attach these cookie cutters to gifts in the place of a bow for a very fancy wrap job.  You could even stick a gift card to the back for the perfect gift combo: something handmade combined with something store bought that you know the receiver will use and enjoy.  

The bottom line?  With cookie cutters being so cost effective and so crafty-cute, there's no reason NOT to use them outside of the kitchen, too!

Tuesday, November 20, 2012

Gratitude Garland

Monthly Monday Challenge #1 HERE

Andrea here!  We are now fully entrenched in my favorite time of the year!  The highlights?  Being able to drink hot chocolate without looking like a weirdo (I down the stuff ALL YEAR, which draws some looks in mid-July), wearing power boots and snuggly sweaters, seeing the changing leaves, getting giddy about Santy Claus's impending visit, spending time with family and friends, eating yummy food (thanks, mom!) and reflecting on our many blessings.  What's not to love about Fall?

To get myself into thankful mode, I put together this Gratitude Garland:


Since the holiday season can get a tad busier than I'd like (we all know THAT feeling), I wanted to make something that was fast and easy, but still meaningful.  I decided to make paper leaves listing some of my greatest joys and blessings and I attached them to a store-bought garland.  And if you want to go even lower stress, just stamp words on store-bought leaves!  It doesn't get any more time-saving than that!


The paper I used to make these leaves is from the "Autumn Melody" collection by DCWV.  I cut out some leaf shapes using the Cricut "Accent Essentials" cartridge, then stamped something I was grateful for on each leaf using alphabet stamps.  I inked and distressed the edges of the leaves and crinkled them and folded them to give them some added dimension.  Then I glued them to the garland and put the pumpkin in the middle.


This project is low-stress and is a great visual reminder to slow down and cherish what's truly important.  It would also be fun to do as a family activity with each family member writing down some things they're grateful for on the leaves.


So whether you use this garland as a circular centerpiece, or weave it in between some Fall-colored candles, you can bet that it will not only look good, but it will also be a good reminder of all the things there are to be grateful for!

Tuesday, November 13, 2012

Paper Pinecone Tutorial

Monthly Monday Challenge #1 Here

Hey there loyal readers!  It's Andrea here with a technique to make paper pine cones using a 3D flower die.  How did this all come about?  I went on a walk yesterday afternoon, saw a cute little pine cone in my path and started thinking about how I could make a dimensional pine cone out of paper to adorn either Fall or Christmas gifts.  I know of at least one very cool die out there that already makes 3D pine cones (thank you, Tim Holtz!), but I didn't have one.  What I did have was a 3D flower die from Sizzix.  So here's how I turned a 3D flower into the pine cone you see on this embellished tin:


Start by cutting out two identical 3D flower spirals from the die of your choice (Sizzix, Lifestyle Crafts, Cricut and Spellbinders all have these spiral-flower designs).


I used DCWV paper because it's sturdy and both sides are colored so you don't have to worry about a back and front.  Next, roll the flowers into their 3D shape, starting from the outside in.  Remember my earlier tip about using a quilling tool to do this!  It makes life so much easier!


You now have two spiral flowers rolled.  You are going to stick these together to form your pine cone.


Because you're going to stick one flower into the other, cut out the center of one of the flowers so that you'll have room to insert the other flower into it.  The one that you cut will form the top of your pine cone.


Use hot glue or the adhesive of your choice to glue the two flowers together.


Once they're glued together, use needle-nose pliers to pull and elongate the bottom flower into a more narrow pine cone shape. 


Wah-la!  The last thing I did was to rub black ink across the pine cone (especially the edges) to give it a little more distinction and to blot out the white core of the paper.


So there you have it!  An adorable pine cone just ready and waiting to be put on the perfect gift!  For my little tin, I used paper from My Mind's Eye as the background and used fabric, tulle and lace to add accents at the top of the pine cone.  I used alphabet stamps for the sentiment.

The great thing about pine cones is their versatility.  You could add glitter to make it more festive or "frost" the edges with white for a winter look. 

Thanks for stopping by and don't forget to check out my my blog for more holiday fun this season!

Wednesday, November 7, 2012

Picture That Sound And MME Memory Box Gift

If you are here for the Scrapbook USA expo Blog Hop. WELCOME!  Click Here

Hello!  Andrea here with a great gift idea as the holidays approach.  I wanted to create something handmade that was pretty to look at, but also had the POW of emotional impact.  The result?  This memory box!


So what's the theory of a "memory box" and how did I create it?  I wanted to make something for my mom, who has filled my life with gifts from her talented sewing hands.  She made me beautiful clothes while I was growing up, she sewed a quilt for me when I got married, and she kept my dolls stylin' when I was a kid by surprising me with new outfits for them.  She is so talented in any sort of handwork and I wanted to honor her for that.  So I put together some notions and fabric to fill the inside of the box:


On these items, I wrote some of my favorite sewing-related memories of her (stamped onto the cloth that unrolls from the spools, written on the back of the button packages, etc.).

Next, I included this nifty recordable card from  Picture that Sound (Special web code at the bottom of the post).  It's a company that makes cards which you can embellish and record a message onto.  You get 20 seconds of recording time to leave just the right sentiment for your loved one.

The card started out like this:


(Front and back views-- you can decorate either side)


And I made it into this.  My mom will just push the "play" button on the back to hear my message.


Adding a personalized message instantly makes any gift more memorable!  So with the notes written to my mom on the sewing notions and a card with a recorded message, I'm hoping she'll see just how much I love and cherish the beautiful things she's made me over the years.


For this project, I used paper, stickers and embellishments from "The Sweetest Thing" collection from My Mind's Eye.  Always LOVE pretty much anything that MME cranks out!  I also used stick pins from Maya Road and flowers from Prima, some of my other favorite brands.


So if you're struggling to know what to give someone this year, try a memory box filled with things they love, and reasons why you love them, too!  And keep checking my blog for other great holiday ideas!

Shop early!! Picture That Sound has their products Buy 1 Get 1 Free for a limited time! visit them at www.picturethatsound.com and use the code "EarlyBird" to save!

Tuesday, October 30, 2012

Spooky Candy Box

Andrea here!  We're so close to doorbell ringing and candy flinging!  So here's a treat box I made using the Sizzix Bigz shaker box die and DCWV paper.  Here's a link to DCWV's blog so you can keep up with all their papery happenings!  http://dcwvinc.blogspot.com/


I wrapped a strip of black fabric around the box and stuck a Halloween sprig under the fabric for good measure.  I always scope out the floral picks, garlands and floral sections of the craft stores to incorporate twiggy elements into my paper crafts.


I've always liked this particular box shape because the top is a flap that lifts up and there's a "framed" layer that folds out the other wayI put a pair of my handmade clay eyeball earrings in with some tulle, but the box is also very cute when filled with candy.  If it's small candy, you'd just have to put a piece of clear plastic over the frame opening so it doesn't spill out.


All in all, a good die shape and some good paper.  I like DCWV cardstock for boxes especially because it's sturdy enough to hold up and it has a cool texture to it (and it's textured differently on both sides so you can go heavier texture or smoother texture, depending on your mood).  And if you're into dry embossing, the paper's white core will always allow your embossed shapes to really come to life when you sand over the embossed image.  You can't beat a healthy stash of cardstock for any occasion and season!

Friday, October 26, 2012

“Sew” Cute Ghost Card


Halloween's just a few days away, so I thought I'd whip out a ghost-themed tag / mini card.  To make it, I used DCWV Bewitched paper, fabric, Hero Arts alphabet stamps, Colorbox ink and yarn.  I drew the ghost on white fabric with pencil, then I sewed around it with my sewing machine and inked the edges to add some shading.  After that, it was just a matter of layering the different elements. 


After my card was finished, I attached it to a test tube filled with candy bones.  The test tube is from Martha Stewart's Halloween line of products.  Sometimes the hardest part of a "test tube treat" is figuring out what to put inside.  So here's a list of candy and their accompanying creepy names:

Gummy worms: Medusa Hair
Good and Plenty's (white): Troll Teeth 
Mike and Ike's: Dragon Toes
Jelly beans: Lizard Larva
Certs (left in the cylinder packaging) or other mints: Vampire Repellent
Coconut M&M's (white): Spider Eggs
Cinnamon Red Hot's: Slug Hearts
Candy pebbles: Swamp Rocks
Licorice (black): Rat Tails